¶ Preparation
Check the requirements before you begin.
Once the Defend-O-Tron is inline between your ISP and your firewall or router, restarting it stops your internet connection for a few minutes, while the protected zone goes down and comes back.
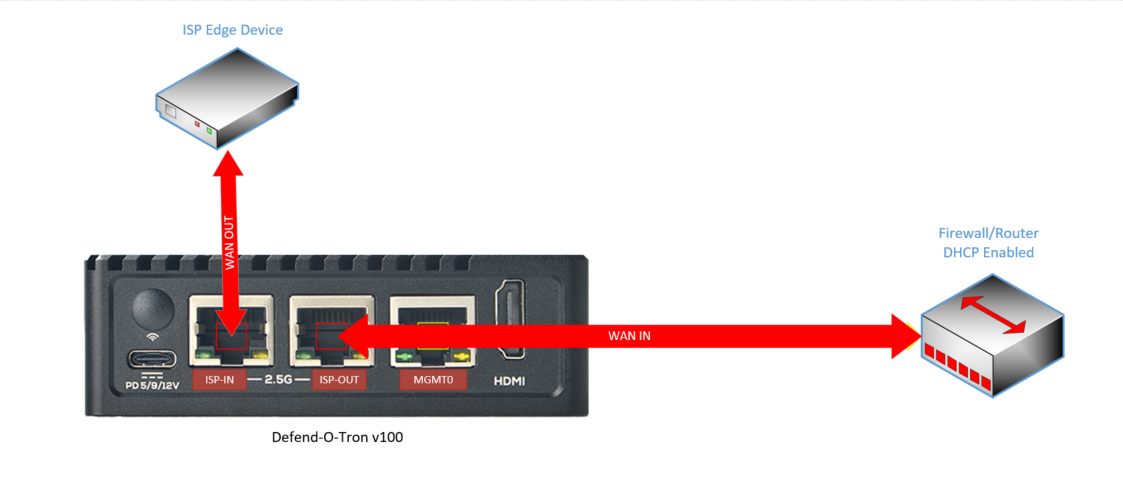
Put the Defend-O-Tron close to the ISP equipment and your firewall or router. The protected zone is cabled from the ISP edge device (for example a cable or DSL modem, an ONT/ONU or an ISP router) to the WAN port of your own equipment.
¶ Checklist
Print this page and use the list as you work through the steps below.
- Preparation Completed
- Initial Setup Completed
- Management Connectivity Completed
- Verify Management Connectivity Completed
- First Login and Setup Wizard Completed
- Cable Protected Zone Completed
- Physical Protection Completed
- Next Steps Completed
Put the Defend-O-Tron inline with your ISP and firewall or router last, after you have checked the management connection.
¶ Initial Setup
First connect the Defend-O-Tron’s management port to your network, then connect the power.
¶ Ports
Each port has its own job, and must be cabled correctly.
Ethernet ports
- MGMT0: the management connection. It also gives the device its internet access.
- ISP-IN: the cable from your ISP equipment, into the protected zone.
- ISP-OUT: the cable from the protected zone to your firewall or router.
- The V200 has a fourth Ethernet port, which is not used.
Power
- V100: USB-C (5, 9 or 12 V).
- V200: 12 V DC.
Other ports
- A monitor port (HDMI on the V100; HDMI or DisplayPort on the V200) and USB ports, for a monitor and keyboard.
- V100 only: a serial console header (UART).
After setup, Device → Hardware → Network ports has a Find port row. Blink its LED blinks the LED of a port for 2 minutes, so you can check which socket is which.
¶ Connect the Management LAN
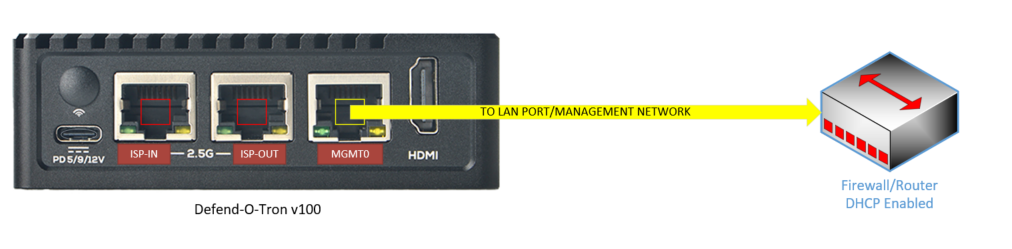
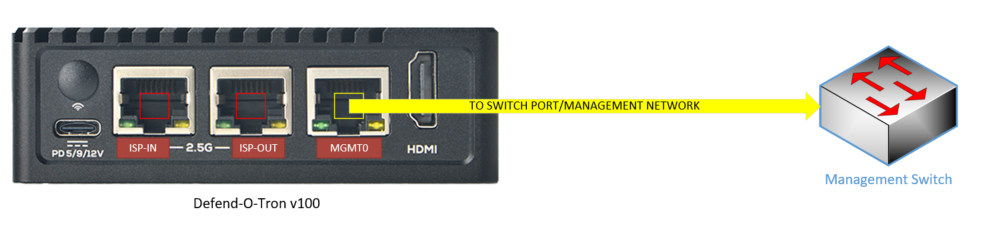
Connect the management port to your network: directly to a LAN port of your firewall or router, or to a switch port on your management network. For the first setup, that network needs a DHCP server. In a simple setup the management network can be your normal LAN. It must be a network that you can reach to manage the device, and it must have a way out to the internet for updates. Most makers mark the LAN ports with a colour or a label.
The device accepts management connections from 10.0.0.0/8 and 192.168.0.0/16 by default. See Which networks can manage the device if your network uses another range.
- Connect the MGMT0 port to a LAN port on your router
OR VIA A SWITCH
- Connect the MGMT0 port to a switch port on your management network.
¶ Connect Power
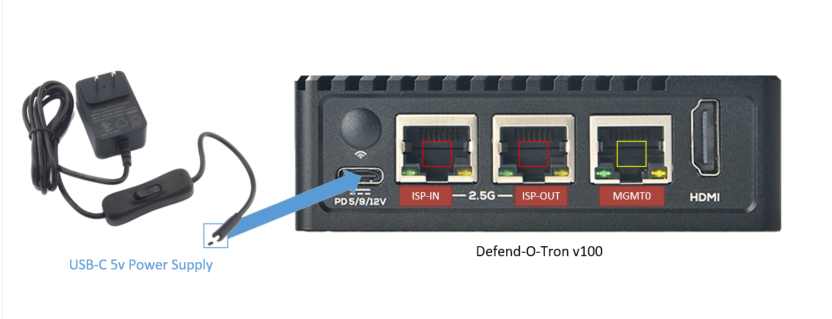
Connect the power only after the management port is connected.
-
V100: connect the USB-C power adapter. The adapter has an on/off switch: make sure it is on. The red SYS LED on the front blinks while the device starts.
-
V200: connect the 12 V power adapter, then press the power button.
-
Connect the power adapter and power on the device.
¶ Management Connectivity
The management port gets its IPv4 address from your DHCP server. The device gives the DHCP server its name, defend-o-tron, so you can find it in the server’s list of leases.
Reserve an address for the Defend-O-Tron on your DHCP server, or give it a static address in the Setup wizard (and later on Device → Management port). A fixed address keeps the device’s DNS names working (see DNS Filter).
If the device cannot reach a DHCP server, the management port has no address and cannot be reached over the network. Connect it to a network with DHCP for the first setup, then set a static address in the Setup wizard if you need one.
The tabs below are for particular situations or IT policies. Normally you do not need them.
Connect a monitor and a USB keyboard to see the device’s console. You can also connect only a monitor and watch it start.
The console shows the device’s management address when it has started.
When the device has started, the console shows:
- Web Admin NO DNS: the web interface by address,
https://<management-ip>:9090. - Web Admin DNS: the web interface by name,
https://defend-o-tron.protected.lan. - DNS: the address to give your router or DNS server.
- Base Domain: the domain the device answers for (
protected.lan). - DNS Dashboard: AdGuard’s pages,
https://adguard.protected.lan.
If the address is missing or is on the wrong network, the management port is not getting a DHCP address. Check the cable and that the DHCP server can be reached.
If your management network is a VLAN, set the switch port that the Defend-O-Tron’s management port connects to as an access port for that VLAN. The Defend-O-Tron then sees ordinary untagged traffic and needs no change.
The device does not support a tagged VLAN on its management port in this firmware. Use an access port.
PVID (“Port VLAN ID”) sets which VLAN the untagged traffic on a switch port belongs to. An access port carries one VLAN only, untagged, which is what end devices such as the Defend-O-Tron need. See your switch’s documentation for its details.
Some typical access port setups follow.
These are examples only. Interface and bridge names in your network may be different. Ask your IT administrator if you are not sure.
¶ Cisco switch (IOS 12.X, 15.X)
In this example the Defend-O-Tron is connected to port 10 of the switch.
To make port 10 an access port that carries VLAN XX only:
switch# configure terminal
switch(config)# interface FastEthernet 0/10
switch(config-if)# switchport mode access
switch(config-if)# switchport access vlan XX
¶ MikroTik switch (CRS-X series)
In this example the Defend-O-Tron is connected to port ether1 of the switch.
To make ether1 an access port that carries VLAN XX only:
/interface bridge
add comment="Master Switch Bridge" name=switch-bridge vlan-filtering=yes

/interface bridge port
add bridge=switch-bridge comment="Defend-O-Tron" interface=ether1 pvid=XX

/interface bridge vlan
add bridge=switch-bridge untagged="ether1" vlan-ids=XX
¶ D-Link switch
D-Link has a detailed guide for the DGS-1510.
The V100 has a serial console header, for quick command-line access when a technician has little else to hand. You should know the Linux command line to use it. The V200 has no serial console; use a monitor and keyboard.
Install Minicom on Linux or PuTTY on Windows.
Use these serial settings:
- Baud rate: 1500000
- Data bits: 8
- Parity: none
- Stop bits: 1
- Flow control: none
user@host:~$ minicom -b 1500000 -D /dev/ttyUSBx # replace x with your adapter's number
¶ DNS
The Defend-O-Tron answers for its own names under protected.lan, such as defend-o-tron.protected.lan for the web interface. It also includes AdGuard Home, an ad- and malware-blocking DNS filter you can use for your whole network.
To use these names, your network’s lookups for protected.lan need to reach the Defend-O-Tron. You can send only those names to it from your existing router or DNS server, or use it for all of your network’s DNS. The step-by-step guide, with examples for Windows Server, MikroTik, pfSense, OPNsense, UniFi, FortiGate, Meraki and Linux, is Use the Defend-O-Tron for DNS.
Until DNS is set up, reach the web interface by its address instead:
https://<management-ip>:9090.
¶ Verify Management Connectivity
When you know the device’s management address, check the connection by opening the web interface (see First Login below).
Other ways to check:
- Ping the device by its address from Windows or Linux.
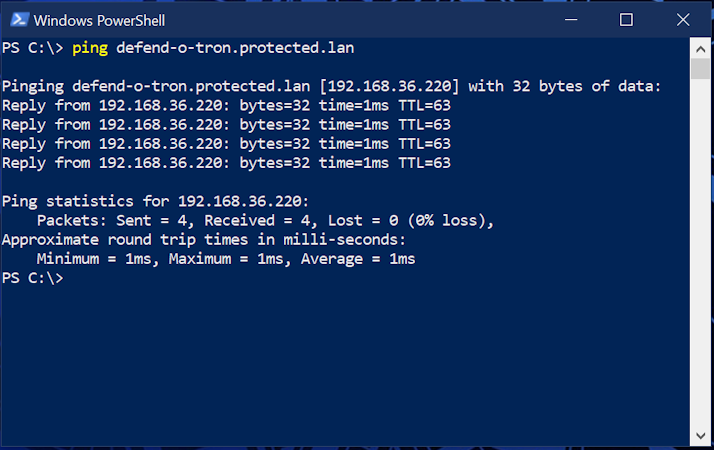
- Ping the device by its name from Windows or Linux.
- Sign in on the console and ping an external host, such as google.com.
Ping the Defend-O-Tron by name: it should answer with its address. If it does, your DNS works. If not, check the DNS setup.
Windows sometimes needs a restart, or its DNS cache flushed, before the name works.
Open the command prompt (cmd.exe) or PowerShell (powershell.exe).
In a terminal on your Linux computer:
~ % ping defend-o-tron.protected.lan -c 5
PING defend-o-tron.protected.lan(defend-o-tron.protected.lan (192.168.10.1)) 56 data bytes
64 bytes from defend-o-tron.protected.lan (192.168.10.1): icmp_seq=1 ttl=64 time=0.115 ms
64 bytes from defend-o-tron.protected.lan (192.168.10.1): icmp_seq=2 ttl=64 time=0.120 ms
64 bytes from defend-o-tron.protected.lan (192.168.10.1): icmp_seq=3 ttl=64 time=0.117 ms
64 bytes from defend-o-tron.protected.lan (192.168.10.1): icmp_seq=4 ttl=64 time=0.114 ms
64 bytes from defend-o-tron.protected.lan (192.168.10.1): icmp_seq=5 ttl=64 time=0.121 ms

--- defend-o-tron.protected.lan ping statistics ---
5 packets transmitted, 5 received, 0% packet loss, time 4088ms
rtt min/avg/max/mdev = 0.114/0.117/0.121/0.002 ms
You need an administrator command prompt. When it is done, try the ping again.
PS C:\> ipconfig /flushdns

Windows IP Configuration

Successfully flushed the DNS Resolver Cache.
¶ First Login
To find the device’s address, look for
defend-o-tronin your DHCP server’s leases, or connect a monitor and read the console.
Open the web interface at https://<management-ip>:9090, where <management-ip> is the device’s address on your management network. Until you install the Root CA, your browser shows a certificate warning. See Login for what the sign-in page looks like.
The web interface answers at several addresses, and each works at any time:
https://defend-o-tron.protected.lan/: through the device’s web proxy, by name. The best choice once DNS is set up and the Root CA is installed.https://<management-ip>/: the same, by address. Works without DNS.https://<management-ip>:9090/: straight to the web interface, past the web proxy. Useful if the proxy has a problem.Port 9090 answers HTTPS only. If you type
http://, the device sends your browser to the HTTPS address.
¶ Default sign-in
-
Sign in with user name admin and password admin. You must choose a new password straight away.
-
Then the Setup wizard opens. Until it is finished, the web interface shows only the wizard. It takes you through:
- Time zone
- Management IP: keep DHCP, or set a static address
- Enrollment: the device’s link to the Awesome-O support console
- Home network: your public addresses, for intrusion detection
- Root CA: download the certificate and install it on your computer
- Users: add other administrators or viewers, or skip
- Backup password: keep it somewhere safe
- Summary: whether protection is running, then Finish setup
If you leave and come back, or the device restarts, the wizard continues where you stopped. First-Time Setup goes through each step with a screenshot.
-
The DNS filter (AdGuard Home) has its own sign-in: user name admin, password adguard. Change it on Detection → DNS filtering. See Change the DNS Filter’s Password.
¶ Cable Protected Zone
To put the Defend-O-Tron inline with your ISP and firewall or router, first find your router’s WAN port: the Ethernet port that is connected to the ISP edge device now. Most makers give the WAN port a different colour from the LAN ports.
¶ Types of ISP Edge Devices
Here are some typical ISP edge devices you may find. Know how yours gives you an internet connection over Ethernet before you connect the Defend-O-Tron.
- Cable/DOCSIS modem
- DSL/xDSL modem
- GPON/XPON ONU
- Wireless point-to-point (PTP) bridge
- Fiber media converter (active fiber)
¶ Connecting to the ISP device
- Unplug the WAN cable from your router and plug it into ISP-IN on the Defend-O-Tron.
This is the cable from the ISP edge device. - Connect ISP-OUT to your router’s WAN port, where that cable was before.
- Check your internet connection: open a website on a computer.
You may need to restart your firewall or router so that it gets or renews its IP address.
- Connect ISP-IN to the ISP edge device’s WAN port
- Connect ISP-OUT to the firewall or router’s WAN port
¶ Physical Protection
Keep the Defend-O-Tron secure and away from people who should not have access to it. Physical access to any device, not only the Defend-O-Tron, can let an attacker get past your security equipment.
Keep these points in mind:
- Don’t put it in a tight space with little or no air flow.
- Don’t hide it in an area nobody watches.
- Keep the location locked when nobody is working on it.
- If you can, keep a log of the people who have access to it.
- Video surveillance is a good idea.
¶ Next Steps
- Install the Root CA certificate on the computers you manage the device from, so HTTPS works without warnings (Windows, macOS, Linux and Firefox are covered).
- Set up the DNS filter: point your network’s DNS at the Defend-O-Tron to use AdGuard’s filtering.
- Tour the Threat activity pages: the dashboard and its global attack map, alerts, decisions and history.
- Check the Firmware page: which firmware your device has, and whether an update is offered.
- Read about Compliance Reporting if you need NIS2, SOC 2 or similar audit evidence. The audit subsystem runs on its own from the first day.