¶ First-Time Setup
The first time an administrator signs in to a new Defend-O-Tron, it asks for a new password, then opens the Setup wizard. The wizard takes you through the settings every device needs, one step at a time.
- Until setup is finished, an administrator sees only the wizard and the Profile page. Every other page stays closed. SSH and the device’s console are not affected.
- Each step is saved as you go. If you are signed out, or the device restarts, the wizard carries on where it stopped.
- The step list on the left shows each step’s choice (Kept, Changed, Done, Skipped, Added). You can go back to any step you have already done.
Before you start, connect the device and find its address as described in the Installation Guide. Then open
https://<management-ip>:9090in your browser.
¶ Choose a New Password
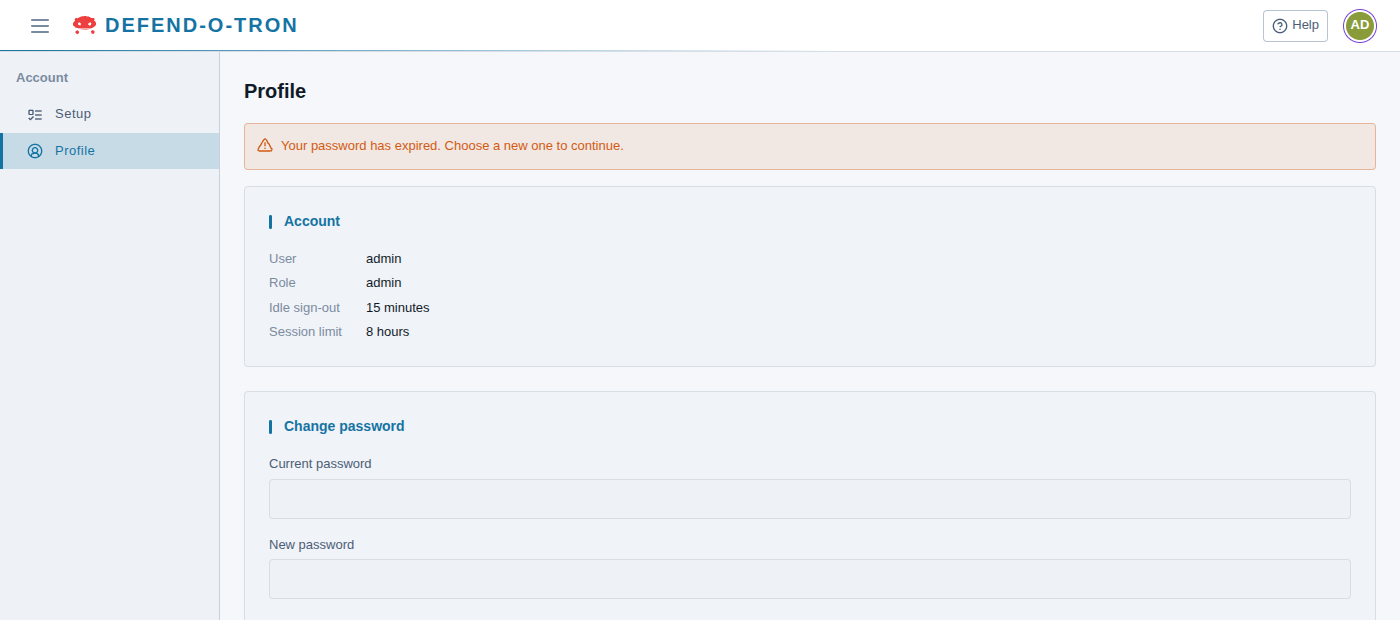
Sign in with user name admin and password admin. The device sends you to the Profile page, which says Your password has expired. Choose a new one to continue.
- In Current password, type
admin. - Type your new password in New password and again in New password again.
- Click Change password. The wizard opens a moment later.
¶ The Steps
¶ 1. Time zone
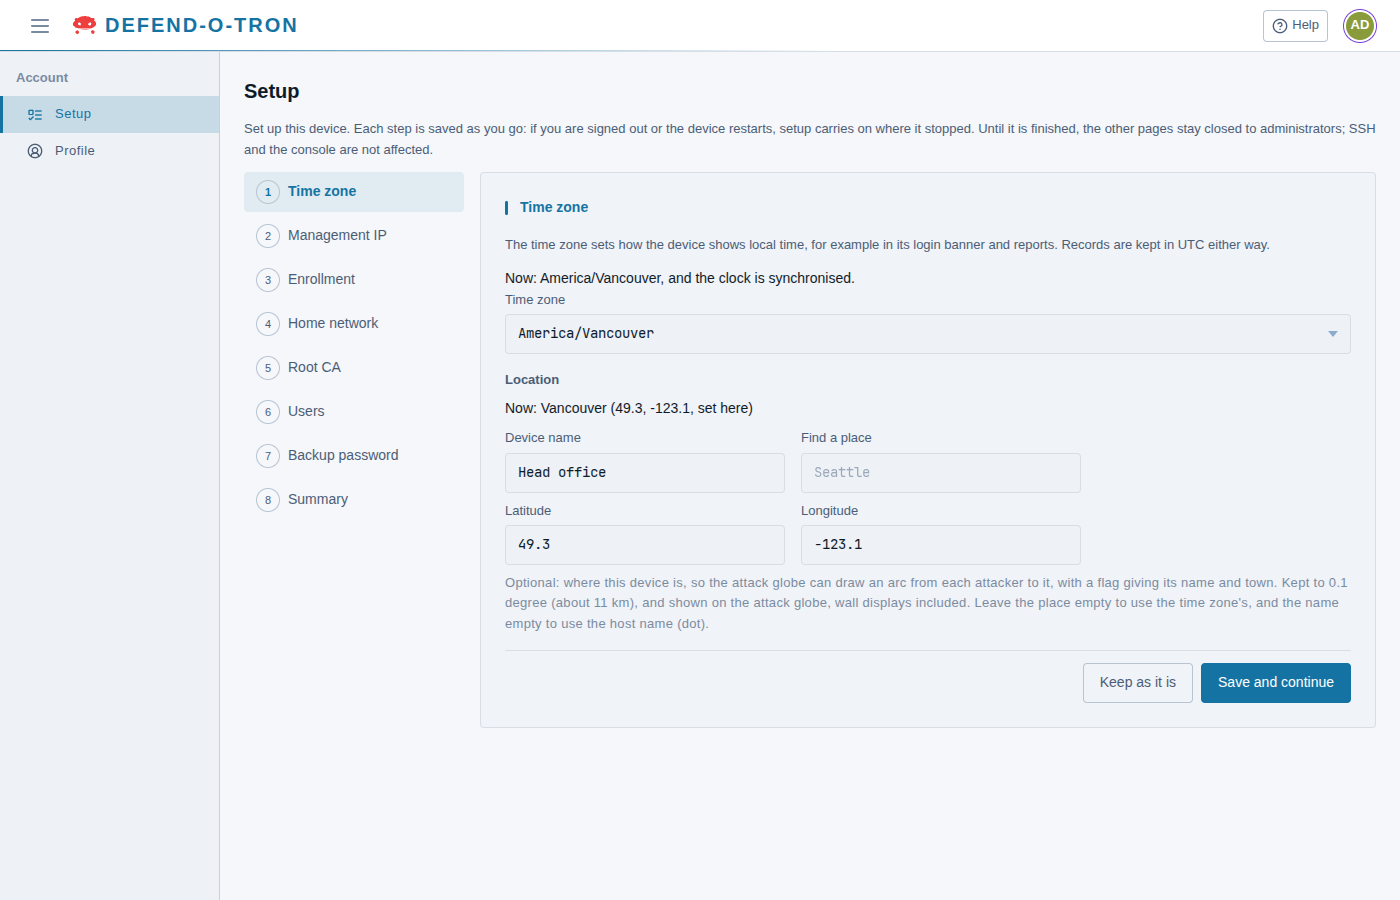
Choose the time zone the device shows local time in, for example in its sign-in banner and reports. The device keeps its records in UTC either way. The step also says whether the clock is synchronised.
¶ Location: your place on the global attack map
Under Location you can say where the device is (optional). The global attack map, the globe on Threat activity → Dashboard and on wall displays, then shows your device at that place: it draws an arc from each attacker to it, with a flag giving the device’s name and town.
- In Find a place, type the first letters of your town. Pick it from the list, which shows each town with its country, for example Seattle, US. The Latitude and Longitude fill in by themselves. You can also type them yourself.
- In Device name, give the device the name its flag shows, for example Head office (up to 40 characters). Leave it empty to use the device’s host name.
The towns come from a list built into the device: nothing is looked up on the internet. The location is kept to 0.1 degree (about 11 km). If you leave the place empty, the map uses the main city of your time zone, and shows no arcs for a time zone without one, such as UTC. You can change the location later on Device → Hardware, on the Time zone config tab. See Dashboard for the map itself.
Click Save and continue, or Keep as it is.
¶ 2. Management IP
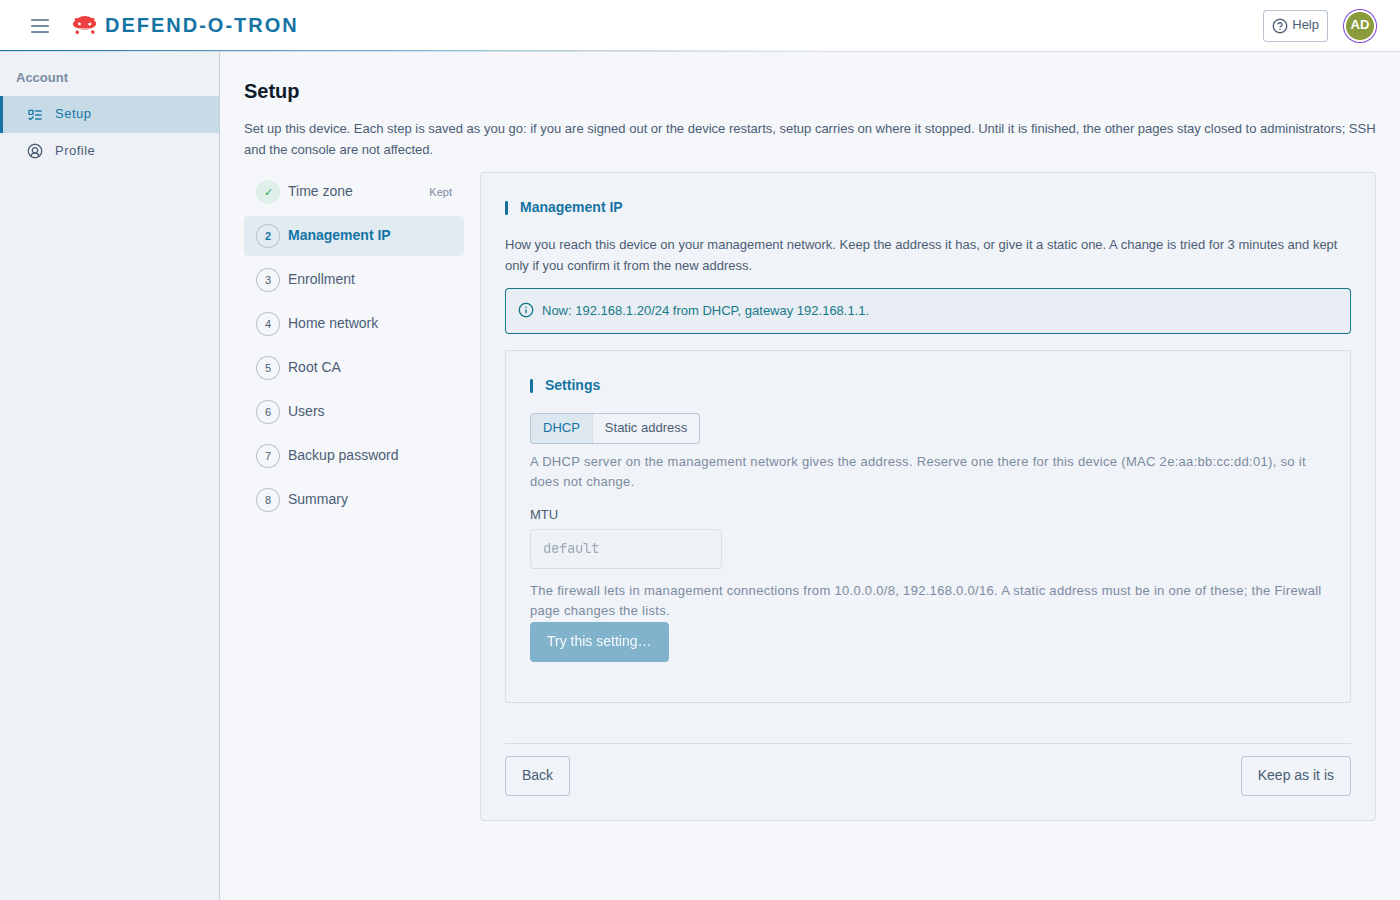
How you reach the device on your management network. The box at the top shows the address it has now.
- DHCP keeps the address from your DHCP server. Reserve one there for the device (the step shows its MAC address), so it doesn’t change.
- Static address asks for the address, the prefix length and the gateway. The address must be in a range the firewall lets manage the device (by default
10.0.0.0/8and192.168.0.0/16; see Requirements).
Try this setting… tries a change for 3 minutes. If the device gets a new address, open that address in your browser and sign in there: you come back to this step, where you keep the setting. If you don’t keep it within 3 minutes, the device goes back to the old setting by itself.
To change nothing, click Keep as it is. You can change it later on Device → Management port.
¶ 3. Enrollment
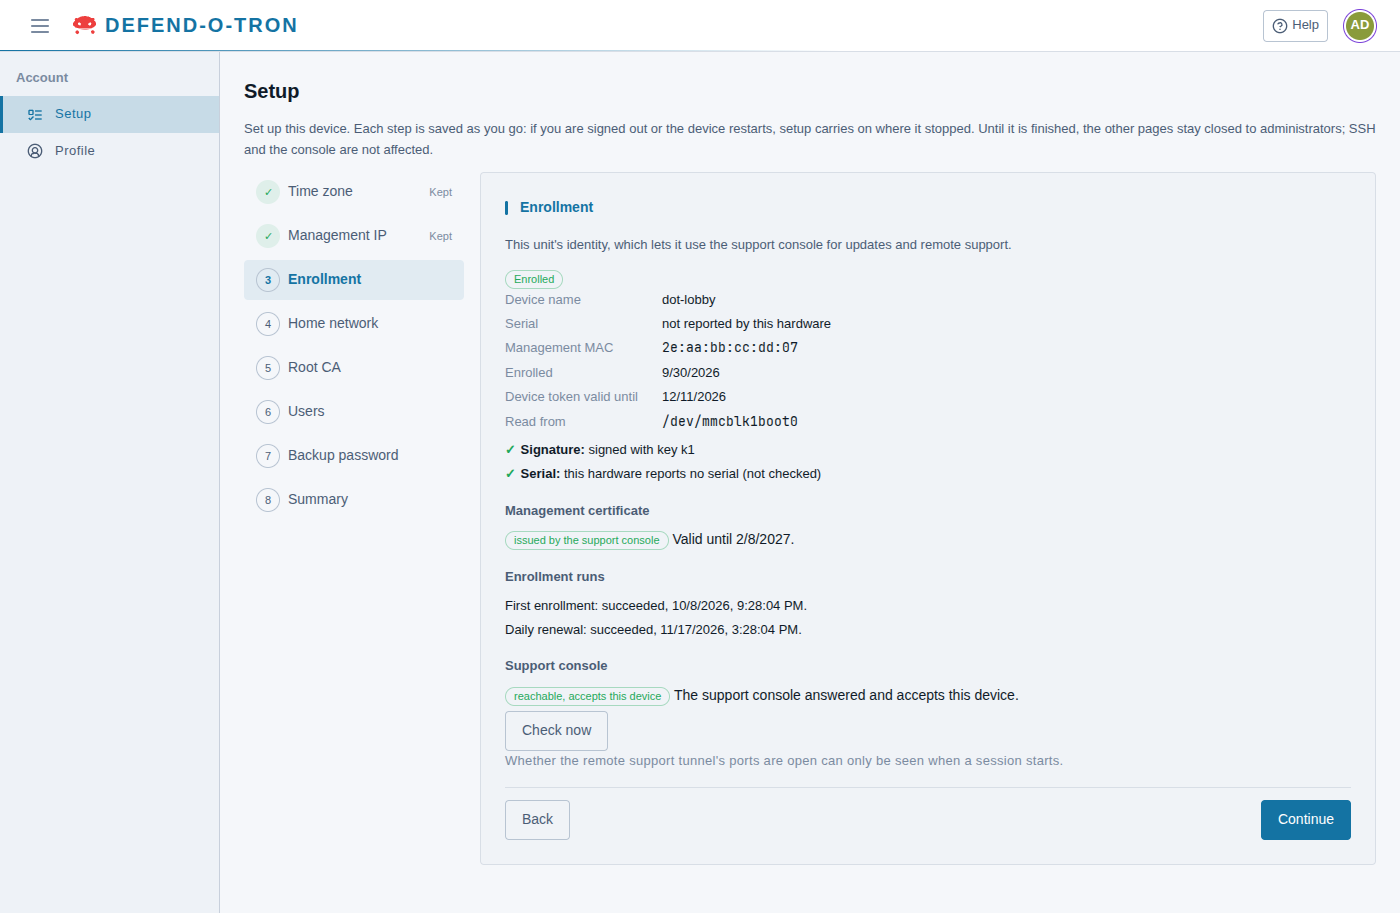
The device’s identity, which lets it use the Awesome-O support console for firmware updates and remote support. A device from the factory already has its identity. The step shows:
- whether the device is Enrolled, its device name, its management MAC address, and until when its device token is valid, with the checks of its identity
- its Management certificate, the certificate of its web pages
- its Enrollment runs: the first enrollment and the daily renewal
- Support console: whether the support console answers and accepts the device. Check now asks again.
Click Continue.
¶ If the device has no identity
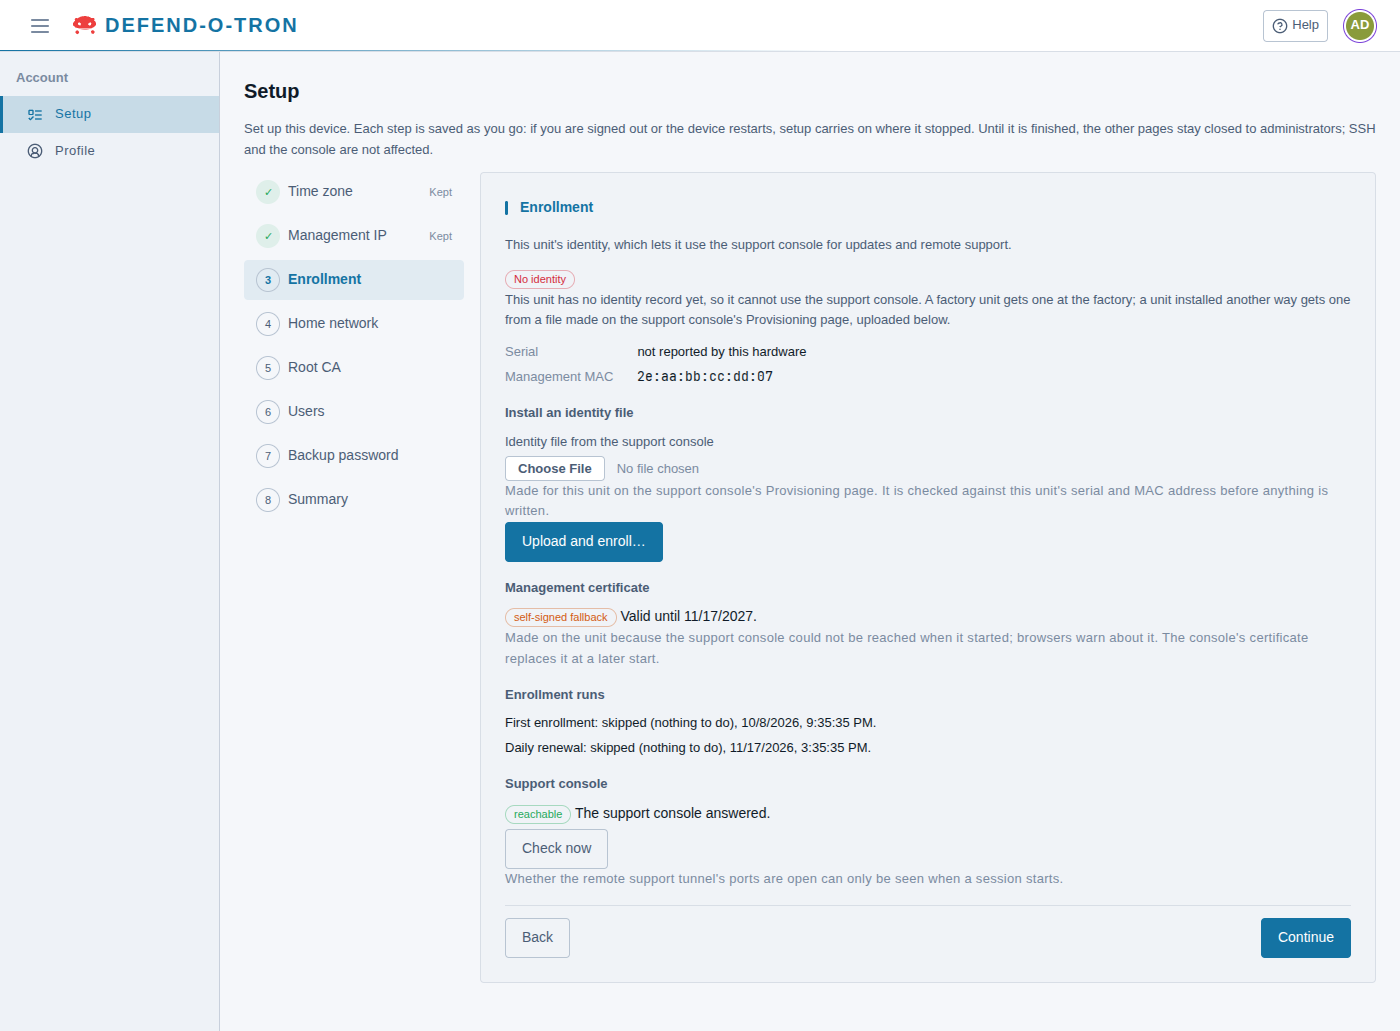
A device that was not installed at the factory may have no identity record yet. The step then says No identity, and offers Install an identity file. Until it has one, the device cannot use the support console for firmware updates or remote support. Its web pages use a self-signed fallback certificate meanwhile, so browsers warn about them.
-
Ask Awesome-O support for an identity file for this device. Give them the Management MAC address the step shows, and the Serial if it shows one: the file is made for this device only.
-
Under Install an identity file, click Choose File and pick the file.
-
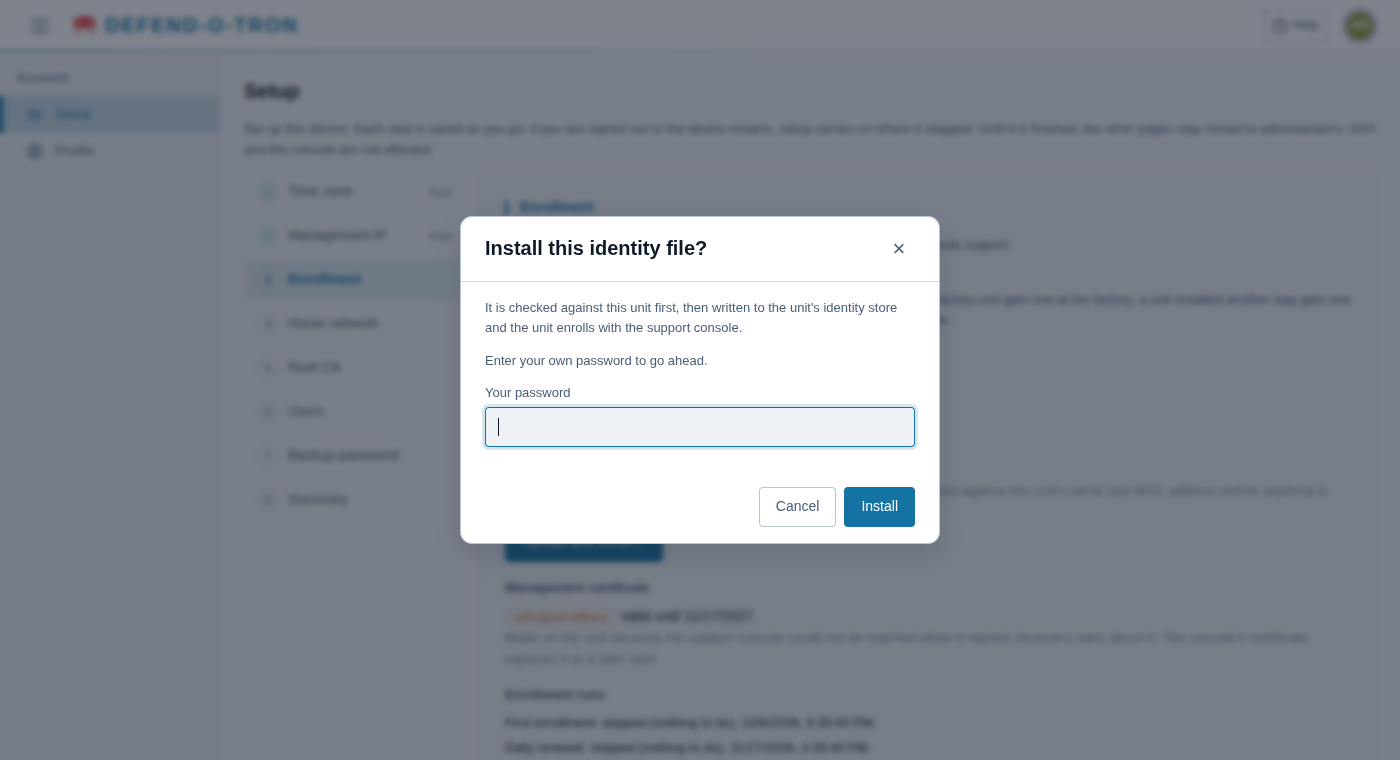
Click Upload and enroll…. Enter your own password, then click Install.
-
The device checks the file against its serial and MAC address before it writes anything, then enrolls with the support console. This can take a few minutes. When it is done, the step says The identity file was installed and shows the device as Enrolled. If the support console could not be reached, the file is still installed, and the device enrolls by itself as soon as it can reach the console. If the file is not for this device, nothing is written, and the step lists the checks that failed.
-
Click Continue.
¶ 4. Home network
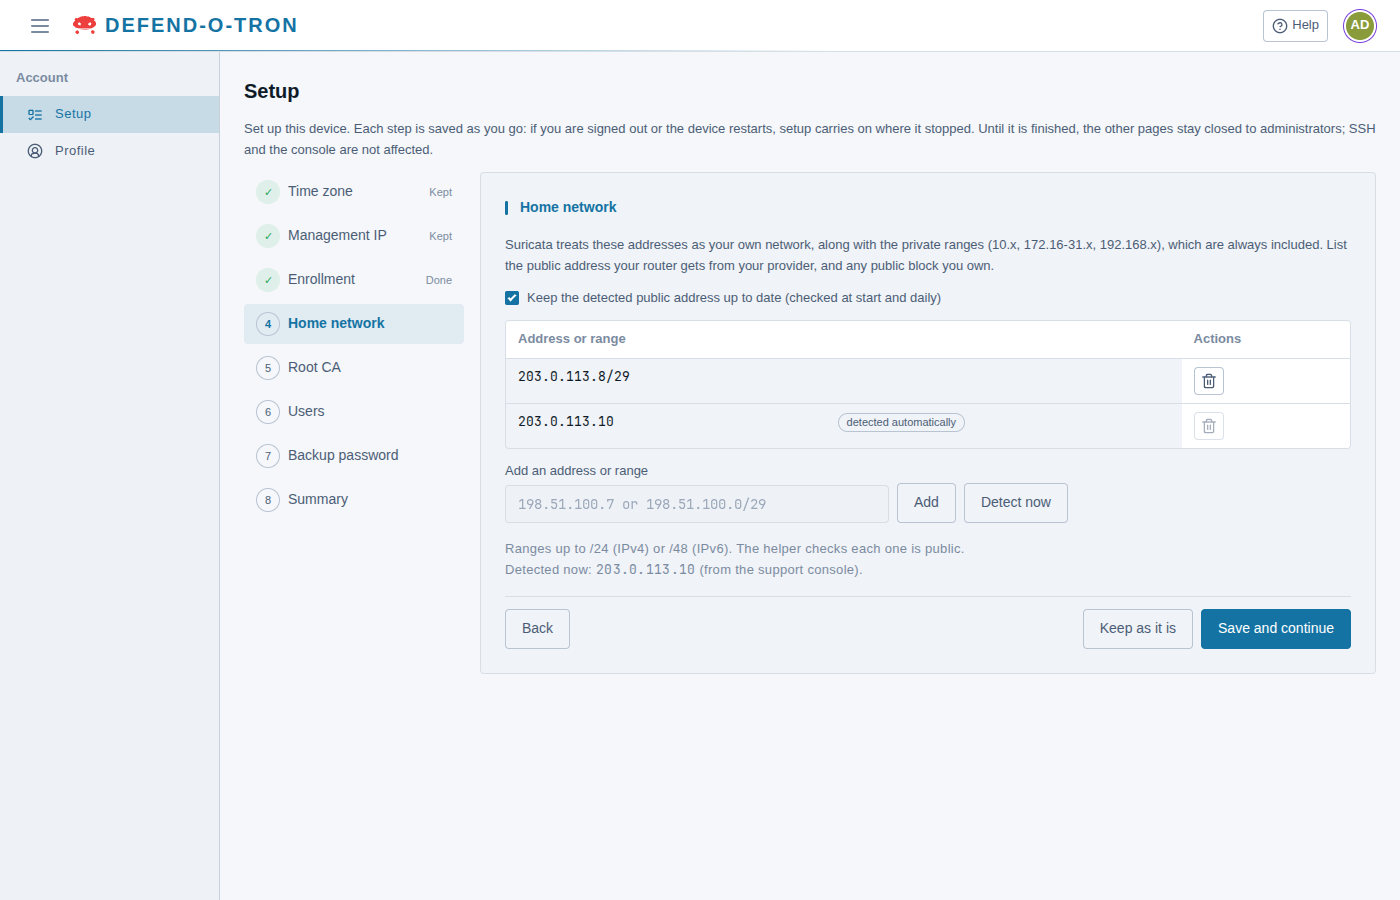
The addresses Suricata treats as your own network, so it can tell attacks on you from other traffic. The private ranges (10.x, 172.16-31.x, 192.168.x) are always included. List the public address your router gets from your ISP, and any public block you own.
- Keep the detected public address up to date finds your public address by itself, when the device starts and every day. The address it found is marked detected automatically.
- Add an address or range adds one, up to a /24 (IPv4) or a /48 (IPv6). It must be a public address. Detect now looks up your public address again.
Click Save and continue to save a change (Suricata restarts to use it), or Keep as it is. You can change the list later on Detection → Firewall, on the Home network tab.
¶ 5. Root CA
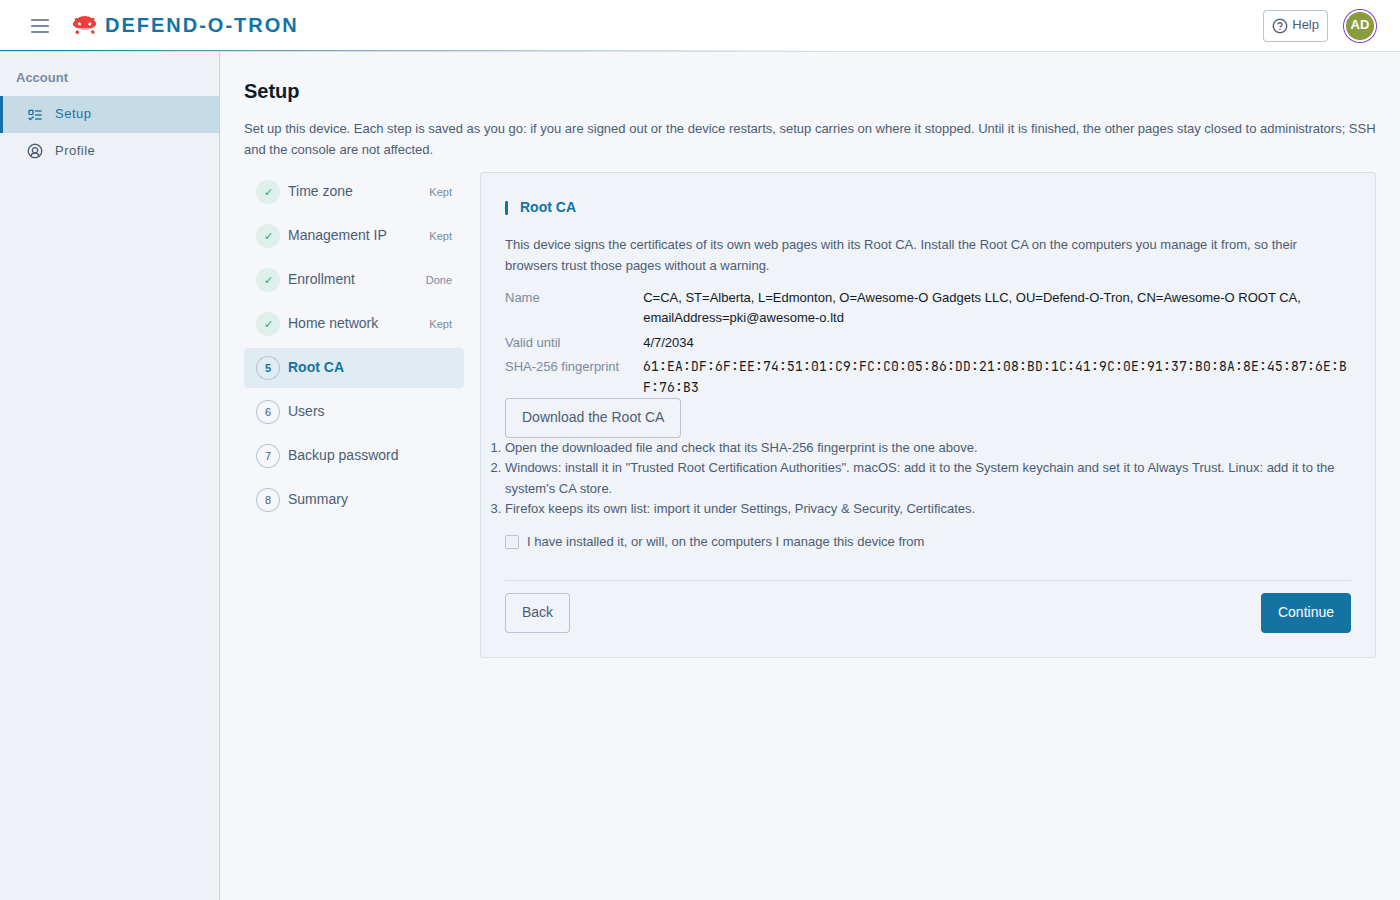
The device’s web pages use a certificate signed by the Awesome-O ROOT CA. Install the Root CA on the computers you manage the device from, so their browsers trust those pages without a warning.
- Click Download the Root CA.
- Open the downloaded file and check that its SHA-256 fingerprint is the one the step shows.
- Install it: on Windows in Trusted Root Certification Authorities, on macOS in the System keychain set to Always Trust, and on Linux in the system’s CA store. Firefox has its own list: import it under Settings → Privacy & Security → Certificates.
- Tick I have installed it, or will, on the computers I manage this device from, and click Continue.
Certificates has the full steps for each system and browser.
¶ 6. Users
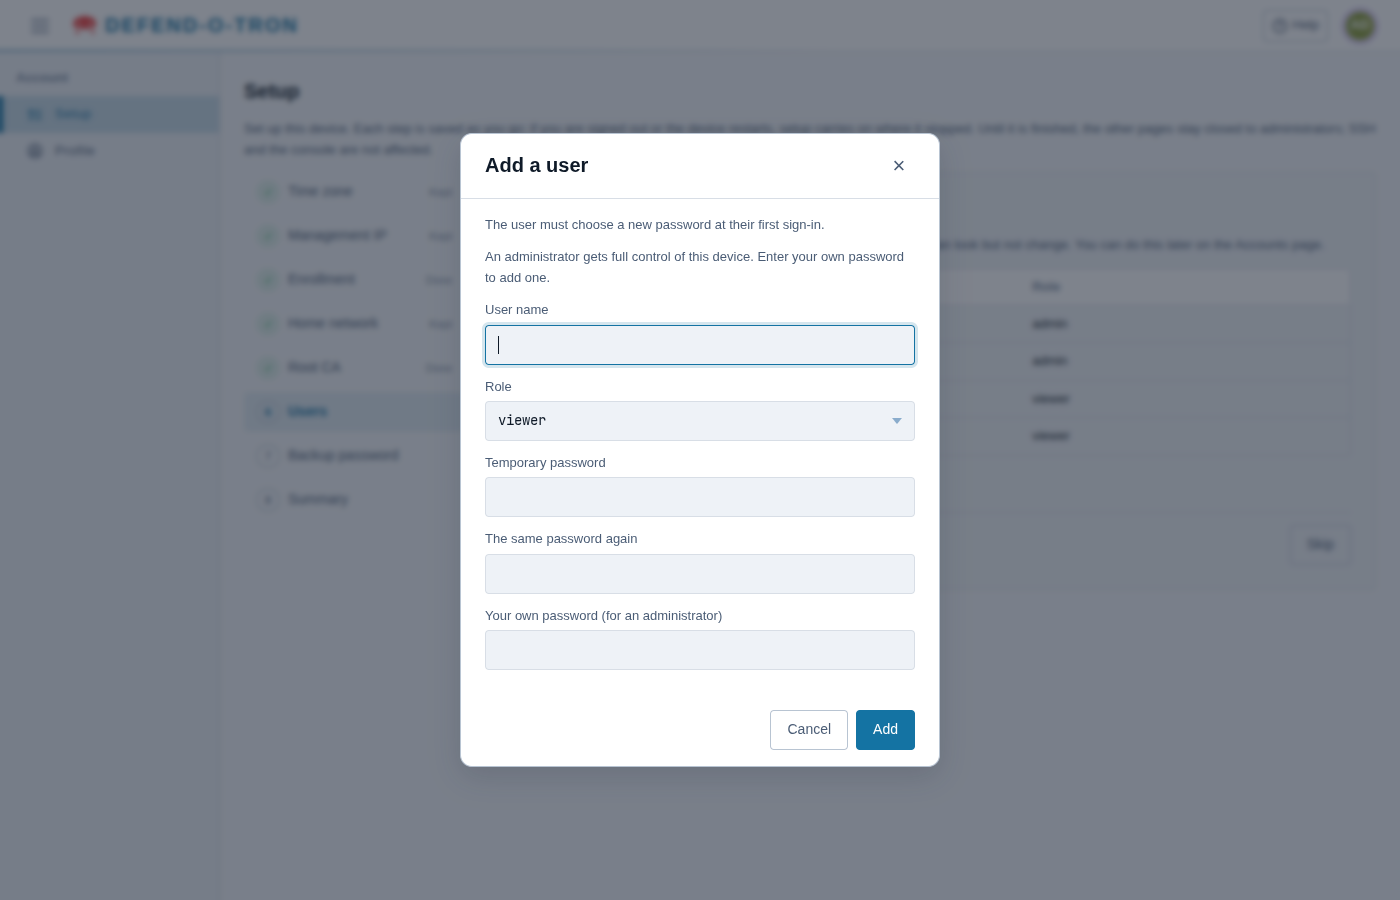
Add the people who will use the web interface: administrators, who can change everything, or viewers, who can look but not change. Add a user… asks for:
- the User name: lower-case letters, digits,
-and_, starting with a letter - the Role: admin or viewer
- a Temporary password, twice. The user must choose a new one at their first sign-in.
- Your own password, to add an administrator
Click Continue when you have added users, or Skip. You can add users later on Account → Accounts.
¶ 7. Backup password
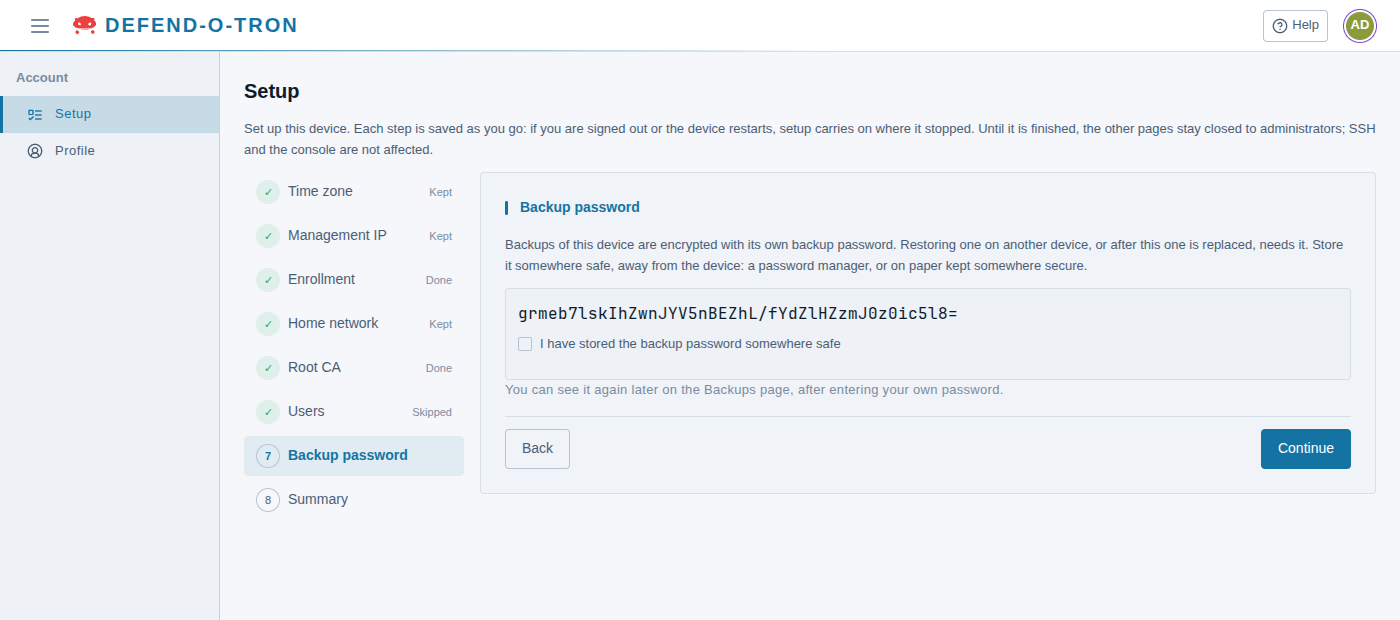
The device encrypts its backups with its own backup password. You need it to restore a backup on another device, or after this one is replaced.
- Click Show the password.
- Store it somewhere safe, away from the device: a password manager, or on paper kept somewhere secure.
- Tick I have stored the backup password somewhere safe, and click Continue.
You can see the password again later on Device → Backups, after you enter your own password.
¶ 8. Summary
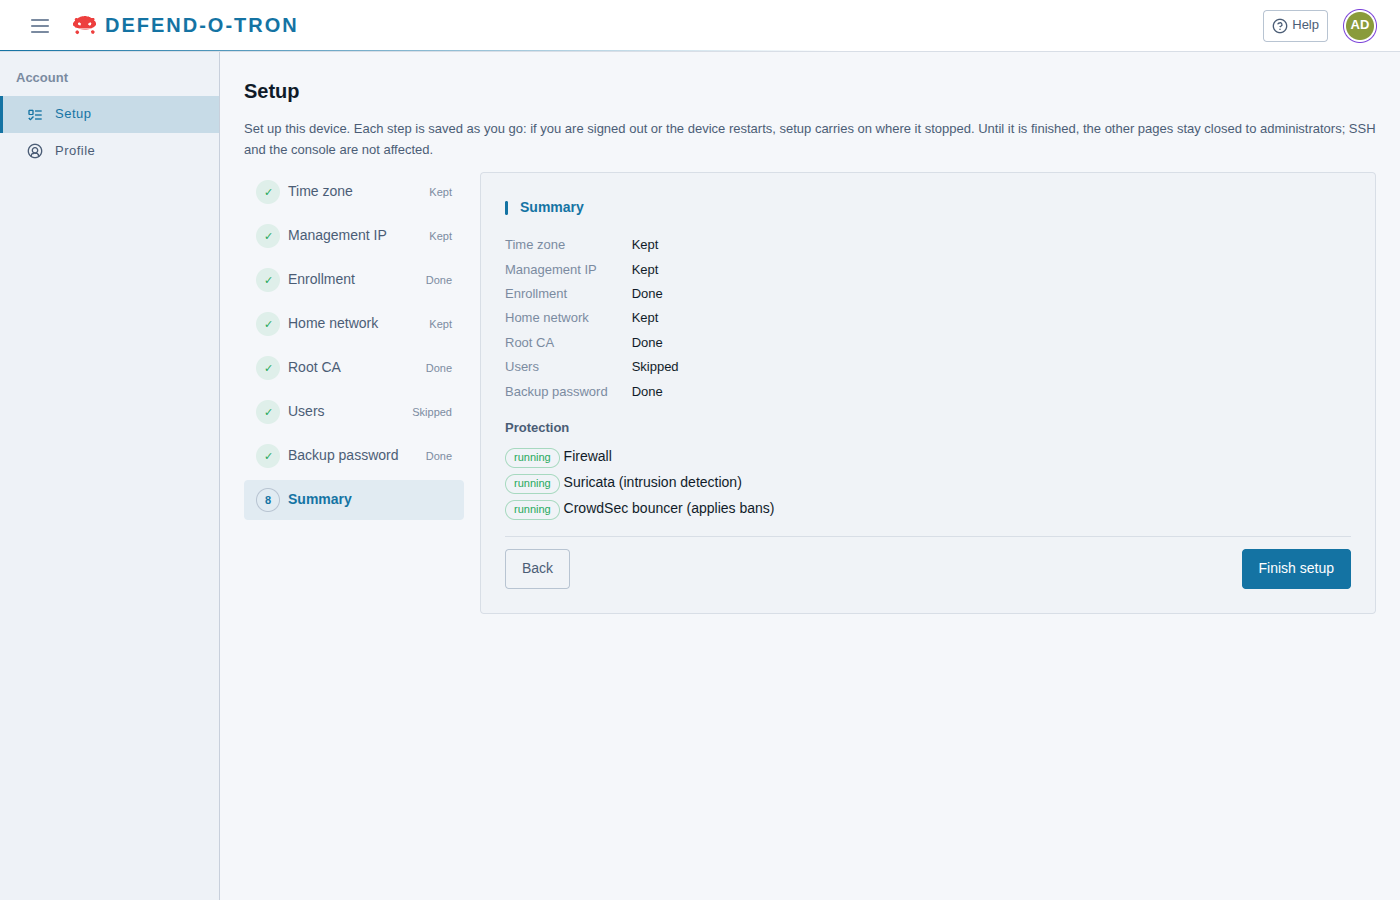
The summary lists each step’s choice, and under Protection whether the firewall, Suricata and the CrowdSec bouncer are running. Click Finish setup: the rest of the web interface opens, starting with the Overview page.
Finish setup works only when every step has a choice. If one is missing, go back to it in the list on the left.
¶ Running Setup Again
An administrator can run the wizard again at any time: on the Overview page, open the First-run setup tab and click Run setup again.
- Nothing changes unless you change it in a step.
- The rest of the web interface stays open, and Leave setup stops at any time.
- Showing the backup password asks for your own password, and is recorded in the audit log.
¶ Next Steps
- Install the Root CA on every computer you manage the device from, if you haven’t yet.
- Set up DNS so the
protected.lannames work, and to use AdGuard’s filtering. - Change the DNS filter’s password. AdGuard Home starts with user name admin and password adguard.
- Cable the protected zone, if the device is not inline yet.
- Tour the web interface.