¶ Send Logs to the Defend-O-Tron
Your firewall, router, and servers already write down every login attempt and every connection they refuse. If they send those records (logs) to the Defend-O-Tron, it reads them for signs of attack and blocks the attackers. The block also reaches every connected system.
Logs are sent with syslog, a standard almost every network device and server supports.
¶ Before you start
- Send security logs only: firewall, login, and web proxy logs. The Defend-O-Tron is not a general log store, and sending everything slows it down. Keep it to one to four systems. Log Ingress explains which logs are useful.
- Find the Defend-O-Tron’s management address. In the web interface, under Device, click Management port. The Address box shows it (in the example below,
192.168.1.20). The steps below call it<management ip>.
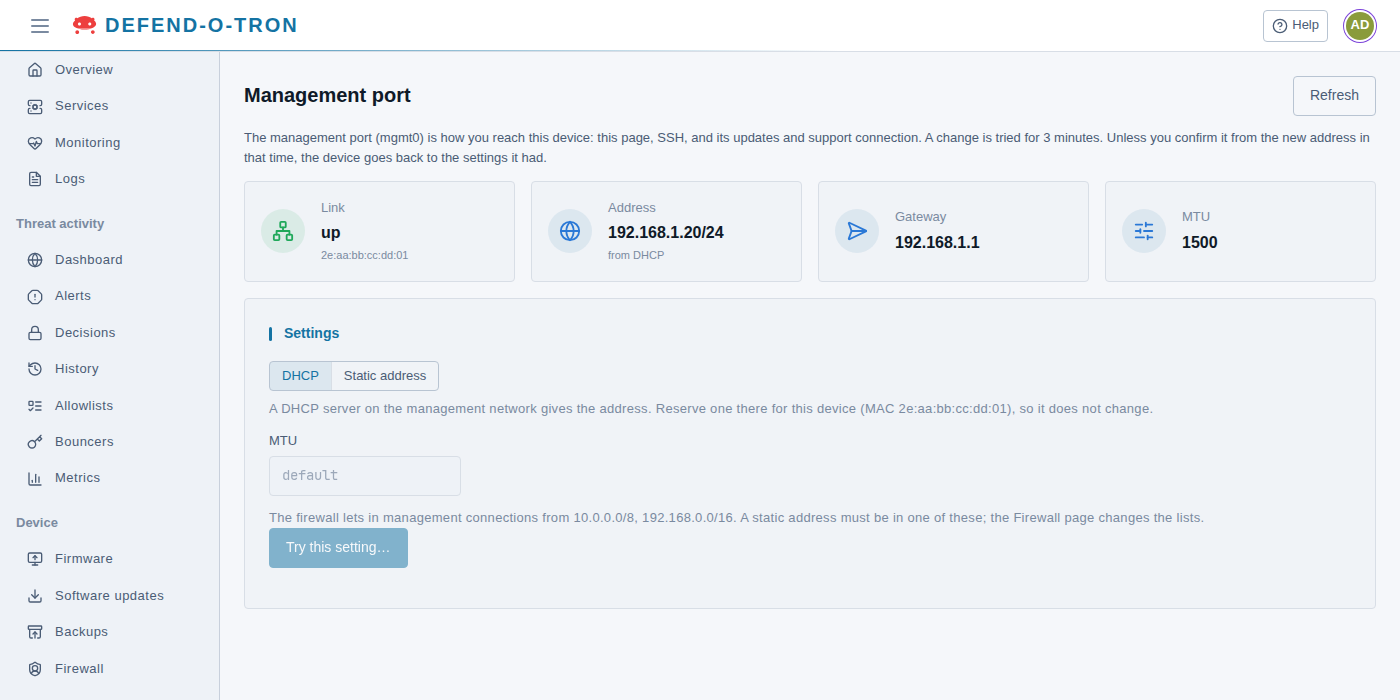
Reserve the management address on your DHCP server, so it never changes and your systems keep sending to the right place.
¶ Step 1: Allow the sending system through the firewall
The Defend-O-Tron only accepts logs from addresses it has been told to trust.
- In the menu, under Detection, click Firewall.
- Find the Management access card.
- Check that the sending system’s address is covered by Management allowed addresses. If it isn’t, add it (for example
192.168.1.1, or a whole network such as192.168.1.0/24). Separate entries with commas. - Its network must also be in Management networks. Add it there too if it is missing.
- Click Save and apply.
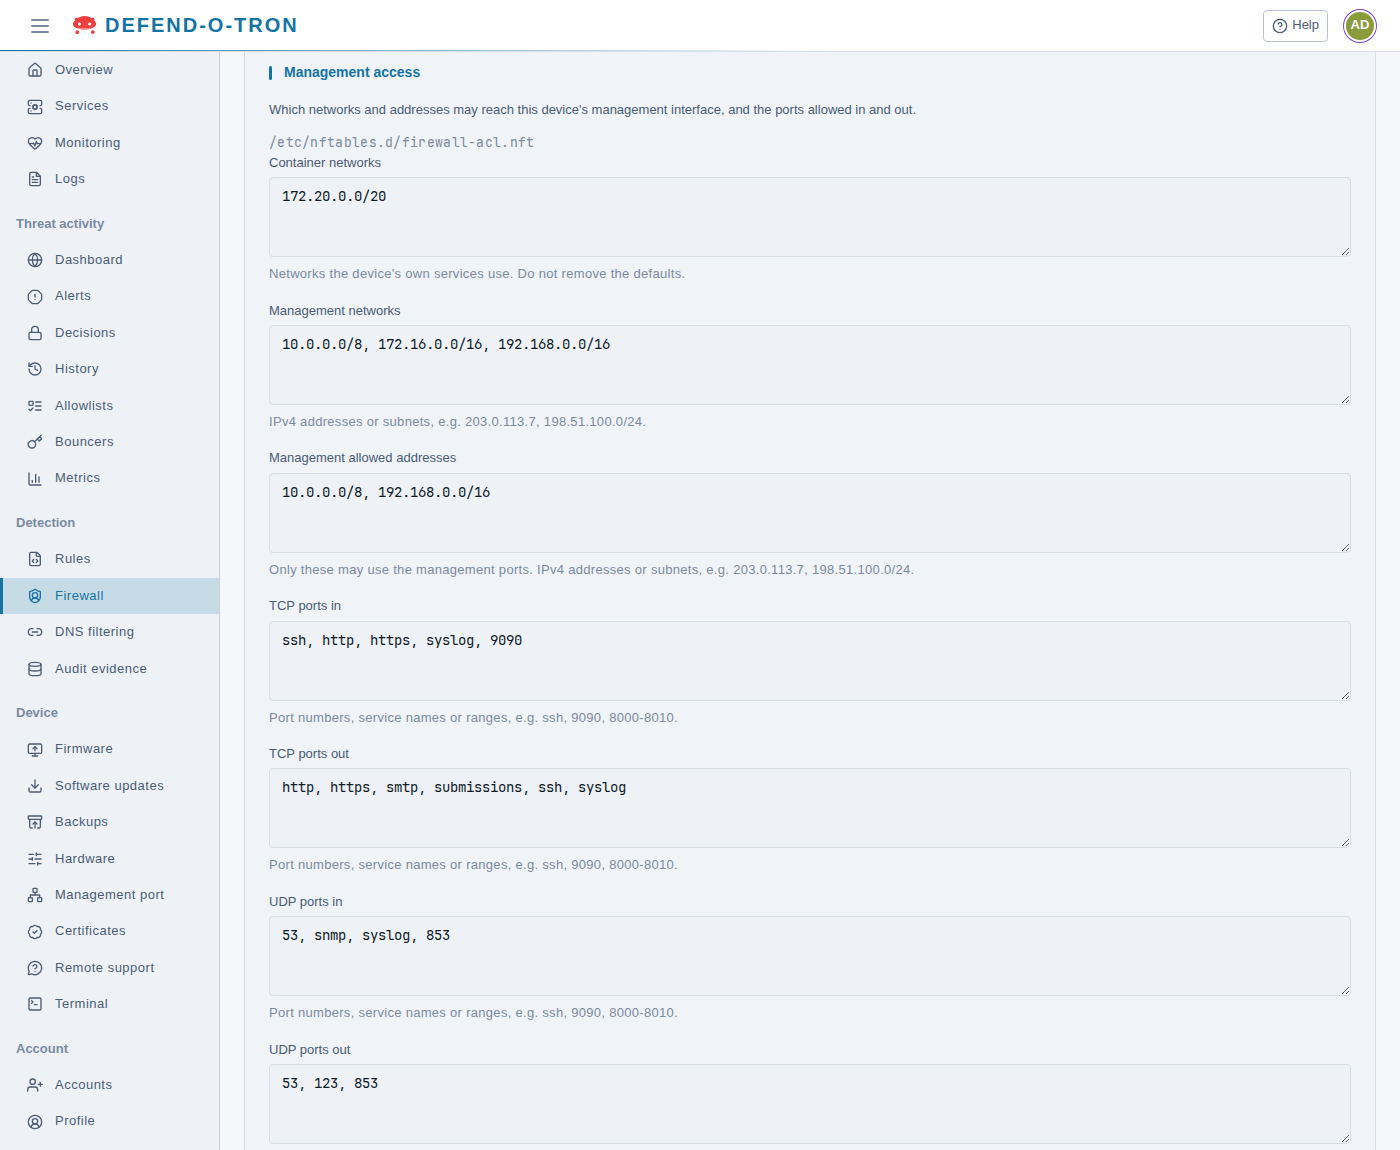
Out of the box,
10.x.x.xand192.168.x.xaddresses are allowed. A system on a172.16.x.xaddress is in the management networks but not in the allowed addresses, so add it to Management allowed addresses.
¶ Step 2: Point the system’s logging at the Defend-O-Tron
The Defend-O-Tron listens for syslog on port 514, over UDP or TCP. Pick your system below.
On Debian, Ubuntu, and most other Linux servers, logging is handled by rsyslog.
-
Create a file named
/etc/rsyslog.d/90-defend-o-tron.conf:sudo nano /etc/rsyslog.d/90-defend-o-tron.conf -
Paste in the line below, replacing
<management ip>. It sends login and security logs (authandauthpriv), which is what the Defend-O-Tron watches for password-guessing attacks:auth,authpriv.* action(type="omfwd" target="<management ip>" port="514" protocol="tcp" action.resumeRetryCount="-1" queue.type="linkedList" queue.size="10000")The queue settings keep the logs safe if the Defend-O-Tron restarts, and send them once it is back. For an application that logs to a facility of its own (such as
local2), add another line with that facility in place ofauth,authpriv. -
Save the file (in nano, press Ctrl+O, Enter, then Ctrl+X) and restart rsyslog:
sudo systemctl restart rsyslog
The full set of options is in the rsyslog documentation.
Docker can send a container’s output straight to the Defend-O-Tron. Use this for containers that log security events, such as a reverse proxy.
Docker Compose: add a logging section to the service in your compose file, then run docker compose up -d to apply it:
    logging:
      driver: syslog
      options:
        syslog-address: "udp://<management ip>:514"
        syslog-format: "rfc3164"
        tag: "my-proxy"
docker run: add the same options to the command:
docker run --log-driver syslog \
  --log-opt syslog-address=udp://<management ip>:514 \
  --log-opt syslog-format=rfc3164 \
  --log-opt tag=my-proxy \
  my-image
See Docker’s syslog logging driver page for more.
Windows doesn’t send syslog by itself. We have tested NXLog Community Edition, which is free.
-
Install NXLog Community Edition.
-
Open
C:\Program Files\nxlog\conf\nxlog.confin Notepad, running as Administrator. -
Add the sections below, replacing
<management ip>. They read the Windows Security log (logins and account changes) and send it to the Defend-O-Tron:<Extension _syslog> Module xm_syslog </Extension> <Input security> Module im_msvistalog <QueryXML> <QueryList> <Query Id="0"> <Select Path="Security">*</Select> </Query> </QueryList> </QueryXML> </Input> <Output defendotron> Module om_udp Host <management ip> Port 514 Exec to_syslog_ietf(); </Output> <Route security_to_defendotron> Path security => defendotron </Route> -
Save the file, then restart the nxlog service from Services (or run
Restart-Service nxlogin an Administrator PowerShell).
Larger networks that already collect events with Windows Event Forwarding can install NXLog once, on the collector server, instead of on every PC.
Add the Windows parser. Out of the box, the Defend-O-Tron does not understand the Windows Security log. Add the
crowdsecurity/windowscollection, then check that the lines are parsed: see Adding a parser.
NGINX can send its access and error logs to the Defend-O-Tron directly. The Defend-O-Tron watches them for web attacks such as scanning and password guessing.
-
Open your site’s configuration (often in
/etc/nginx/sites-available/). -
Inside the
server { … }block, add these two lines, replacing<management ip>:access_log syslog:server=<management ip>:514,tag=nginx combined; error_log syslog:server=<management ip>:514,tag=nginx warn;Your existing
access_loganderror_loglines can stay, so NGINX keeps its own copy too. -
Check the configuration and reload NGINX:
sudo nginx -t && sudo systemctl reload nginx
See NGINX’s syslog page for the other options.
Send RouterOS firewall and login logs to the Defend-O-Tron. See MikroTik’s logging guide for more.
-
In WinBox or WebFig, open System → Logging, then the Actions tab.
-
Open the action named remote and set:
- Remote Address: the Defend-O-Tron’s management address.
- Remote Port:
514. - BSD Syslog: ticked. This is required.
- Syslog Facility:
syslog. Syslog Severity:warning(or what suits you).

-
On the Rules tab, add two rules with the action remote: one for the topic firewall and one for account.

The same settings from the RouterOS terminal:
/system logging action
set [find name=remote] bsd-syslog=yes remote=<management ip> remote-port=514 syslog-facility=syslog syslog-severity=warning

/system logging
add action=remote topics=firewall
add action=remote topics=account
Optional: a router honeypot. Ports your router doesn’t use, such as SSH or Telnet on its internet side, attract scanners. A firewall rule can log anyone who knocks there. Give the rule a log prefix that contains the word BAN in capitals, such as
SSH BAN, and the Defend-O-Tron blocks those addresses. See Honeypot for the idea, and the example below.
/ip/firewall/mangle
add action=jump chain=prerouting connection-state=new in-interface-list=WAN jump-target=add-banned
add action=add-src-to-address-list address-list=banned-all address-list-timeout=1d chain=add-banned dst-port=22,222 log=yes log-prefix="SSH BAN" protocol=tcp
add action=add-src-to-address-list address-list=banned-all address-list-timeout=1d chain=add-banned dst-port=445 log=yes log-prefix="CIFS BAN" protocol=tcp
add action=add-src-to-address-list address-list=banned-all address-list-timeout=1d chain=add-banned dst-port=8291 log=yes log-prefix="WINBOX BAN" protocol=tcp
Replace WAN with the interface list that holds your internet connection.
Send pfSense firewall logs to the Defend-O-Tron. See Netgate’s remote logging guide for more.
- Sign in to the pfSense web interface.
- Go to Status → System Logs, then the Settings tab.
- Under Log Message Format, choose BSD (RFC 3164, default).
- Under Remote Logging Options, tick Enable Remote Logging.
- In Remote log servers, enter
<management ip>:514. - Under Remote Syslog Contents, tick Firewall Events (and System Events for logins).
- Click Save.
To also log traffic that pfSense allows, which helps the Defend-O-Tron spot scans: on the same Settings tab, tick Log packets matched from the default pass rules put in the ruleset, and click Save.
Add the pfSense parser. Out of the box, the Defend-O-Tron does not understand pfSense firewall events. Add the
crowdsecurity/pfsensecollection: see Adding a parser.
For UniFi gateways (Dream Machine, Cloud Gateway) and other devices managed from the UniFi Network application:
- Open the UniFi Network application.
- Go to Settings → CyberSecure → Traffic Logging.
- Under Activity Logging (Syslog), choose SIEM Server.
- Set Server Address to the Defend-O-Tron’s management address, and Port to
514. - Save the change. The application passes the setting to every UniFi device it manages.
See Ubiquiti’s UniFi System Logs & SIEM Integration page for the current steps.
Each UniFi device sends its own logs, not just the controller. If your network is split into sections (VLANs), every UniFi device must be able to reach the Defend-O-Tron on port 514, and every device’s address must be allowed in step 1.
¶ Step 3: Check that logs are arriving
- In the web interface, under Threat activity, click Metrics.
- Scroll to Log sources.
- Each system that sends logs gets its own line, named by the address it sends from, like
/var/log/remote/192.168.1.1.log. A new system shows up within a minute or two of its first log.
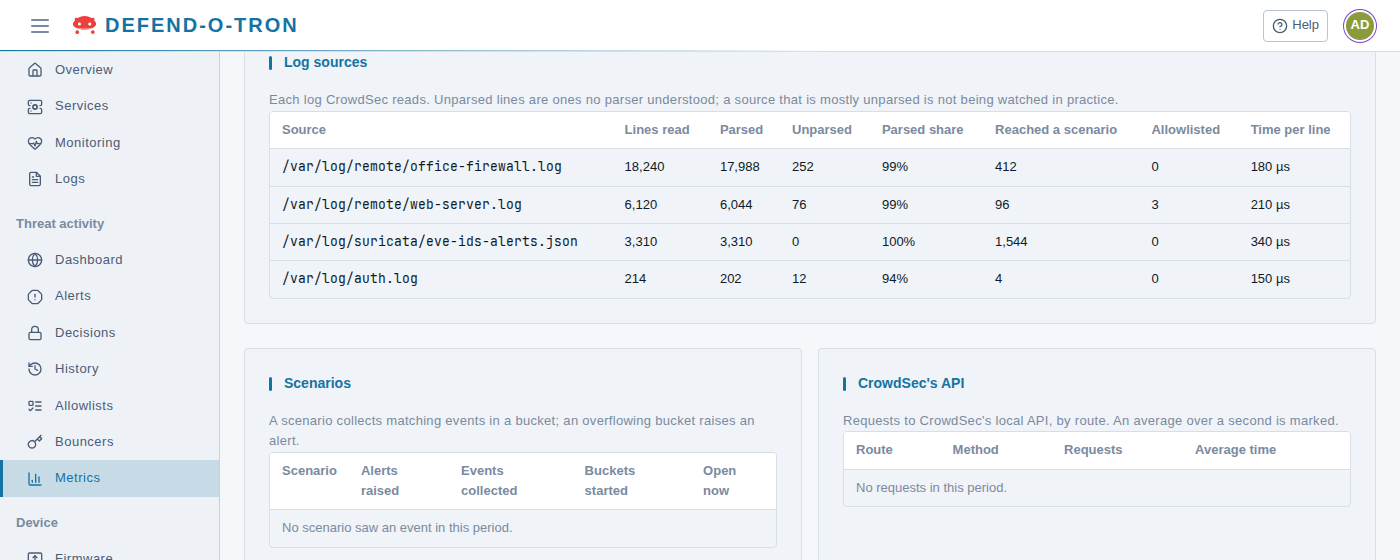
How to read the line:
- Lines read goes up as logs arrive.
- Parsed share shows how much of the log the Defend-O-Tron understood. Near 100% is what you want.
- A source that is mostly Unparsed is arriving but not understood, so it isn’t helping. Check you are sending one of the supported log types, or contact support.
If no line appears after a few minutes:
- Check the address and port on the sending system.
- Check step 1: the system’s address must be in Management allowed addresses.
- Check that nothing between the two blocks port 514, such as a firewall rule between network sections.
¶ Related Pages
- Log Ingress: which logs are worth sending, and why.
- Connect Another System to the Block List: let the same systems block what the Defend-O-Tron finds.
- Honeypot: the scan-trap rules that use these logs.
- Compliance Reporting: every recognised event is also kept in the signed audit record.